Quick ETL With Python Part 1 : Download Files from Sharepoint Online
Hello there, this is my 1st article on Medium, hopefully this article will be helpful for those who have same problems as I had in the past.
This article is the 1st part of 3 parts about “Quick ETL with Python” ;

- {E} Download Files from Sharepoint Online
- {TL} Modify and Upsert Table into SQL
- {Auto} Python Jobs on Window without Installation
This “Quick ETL” is suitable for those with limited resources or some special cases which I’ll explain in part 3.
If you already do your ETL job with something like Spark, Airflow, bah bah bah, then this “Quick ETL” may not be good for you.
So, about part 1, we will use App User to download files from SharePoint online with Python so that we could automate the job and don’t have to worry about user & password, you could read more about this method in the link at the end of this article.

For this article, it will be divided into 3 sections
- Create App User
- Grant Permission for App User
- Download file with Python
1. Create App User
Copy your SharePoint site’s URL, for examplehttps://{YOURSHAREPOINT}/sites/{YOURSITE}
Add /_layouts/15/appregnew.aspx after your site’s URL, for examplehttps://{YOURSHAREPOINT}/sites/{YOURSITE}/_layouts/15/appregnew.aspx
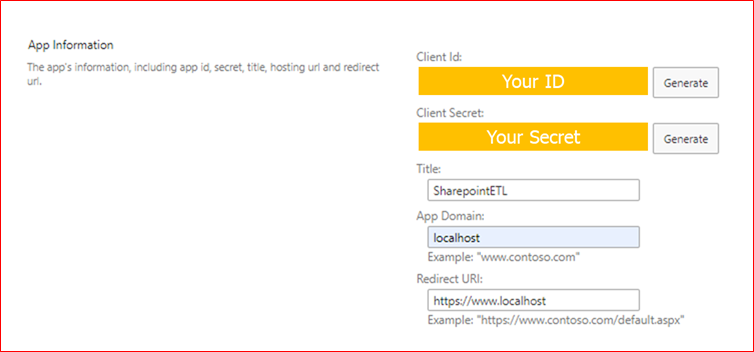
Go to that URL with your browser, it will lead you to set up page as below ;

Press Generate to get Client ID & Secret to get codes.
For Title, App Domain and Redirect URL, you should fill in where your app’s going to use but we could also fill dummies like this. (and it works)

Copy & save them in a text file, we will use them later.
Then click “Create” => “OK”
2. Set up Permission for App User
Add /_layouts/15/appinv.aspx after your site’s URL, for examplehttps://{YOURSHAREPOINT}/sites/{YOURSITE}/_layouts/15/appinv.aspx
Go to that URL with your browser, it will lead you to another set-up page ;

Copy and paste “Client ID” that we saved when created App user, paste it into “App id” and press lookup
In Permission Request XML, paste this to give App user permission
*You could modify this part, read more info in the link at the end of this article
**Careful about double-quotes, format can error during copy & paste
<AppPermissionRequests AllowAppOnlyPolicy="true"> <AppPermissionRequest Scope="http://sharepoint/content/sitecollection" Right="FullControl" /> </AppPermissionRequests>
After that click “Create” => “Trust it”
and now we have App user & Permission we need.
3. Download file with Python
First, we need to get the download URL of your file as these steps
Sharepoint site => hover mouse on the file => Click 3 dots => Copy Link!


We will use my custom library “py_topping”.
This library can interact with SharePoint by the build upon a great library called “Office365-REST-Python-Client”, you could read more about both libraries at the end of this article
to use those libraries, first, we have to install them
pip install py-topping
pip install Office365-REST-Python-Client
After that it just about Python Coding
*I changed function name from “da_tran_SP365” into “lazy_SP365”
# Import library
from py_topping.data_connection.sharepoint import lazy_SP365# Create connection
sp = lazy_SP365(site_url = 'Your Site URL'
                   , client_id = 'Your ID'
                   , client_secret = 'Your Secret')# Create download path from download URL
download_path = sp.create_link('Your Download File Link')# Download file
sp.download(sharepoint_location = download_path
            , local_location = 'local directory you want to save')
And Done!, you already downloaded your file with python.
No comments:
Post a Comment